How I built this site!
Remember, remember the 5th of November?
Or, my previous post. Well, if you don’t, in that post I announced the creation of this site, outlined its purpose, and promised to put together an article on how I put together this website, mainly because it was a bit of a pain to find all of the information I needed to setup and self host Jekyll, and I think it would be helpful to have it all in one place for the sake of my sanity and possibly yours.
Step one, the hardware
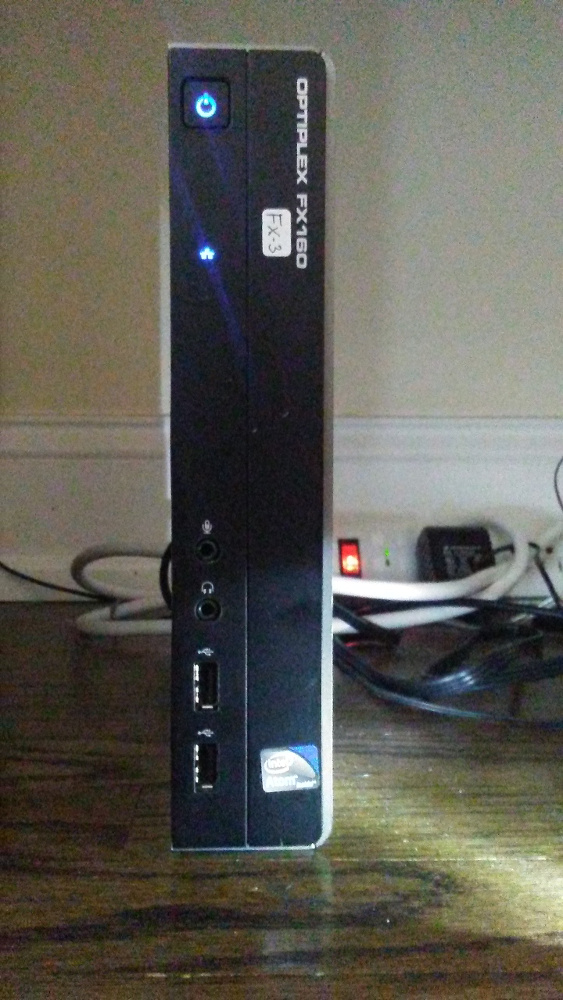
While I do have and Raspberry Pi Model B+ lying around (used for among other things a personal IRC server), I decided that because this new webserver would be hosting both this website and also an Owncloud installation (a personal cloud server and possibly the subject of another post), it would need to run on something a little beefier. That is where the Dell OptiPlex FX160 comes into the picture.
The OptiPlex FX160 is an old thinclient server, meaning that it was used by companies to run Citrix installations that their employees could remote into. The best part is that a whole lot of them have flooded places like Ebay for cheap because it is relatively old hardware that has just gone off lease.
There are a couple of nice things about this box that led to me picking one up:
- They are cheap (I got mine with 3 GB of RAM and a 240 GB hdd for $55, only marginally more than the cost of a Raspberry Pi)
- They are fast:
- Because I can hook up the hdd directly over SATA, the IO bottleneck that made my Pi painfully slow as a webserver is no longer an issue.
- With 3GB of RAM in my case and a 1.2 Ghz Intel Atom, it is pretty snappy.
- They are really energy efficient (not much worse than a Pi).
- They are dead silent (fanless).
- They look pretty sexy in my completely subjective opinion.
- And why not?
And now, onto the software end of things…
If you were like me and thought that the hardware end seemed a little too easy, welcome to the fun part. First stop, Debian.
I chose Debian because it is fast, lean, and very stable with a wide selection of software. Kind of like Ubuntu without all of the bloat they add to Debian. Anyways, Debian owes being lean to people who take the expression
My program is user friendly, it is just very selective about its users
to heart.
A good example of this is quite simply the fact that it is very likely that the last time the Debian webpage was modified was in the mid 90’s (and yes this is the webpage of the same project that runs much of the world’s banking institutions among other things). For instance, it is laughably difficult to actually find the download links for the Debian iso, so to save you a bit of time (to make up for the time you just spent reading my tangent), here is the torrent link and here is the regular over http download link.
Anyways, it is now time to start setting up and configuring your shiny new Debian system:
The OS
The Install
Installing Debian is actually pretty easy. Just
- Burn the iso to your USB (using dd or unetbootin)
- Plug the USB into your soon to be server
- Turn on the future server and hit the function key that lets you select the media to boot off of
- Select your USB and hit enter
- Select install Debian from the GRUB menu
- Follow the instructions
- Sit back, relax, and enjoy the ride
Basic OS setup
Update and install
First of all, let’s make sure all of our software is up to date:
Log in with root credentials (we have not set up the normal user with sudo privileges yet) and run:
apt-get update && sudo apt-get upgrade && sudo apt-get dist-upgrade
Then reboot for good mesure.
Now what we are going to do is setup ssh so that we can run the server headless:
apt-get install ssh openssh-server
Make sure that your favorite text editor is installed:
apt-get install nano vi
Setup your user
Now, lets make things more convenient by granting your normal user sudo privileges:
- Install sudo:
apt-get install sudo - Grant privileges:
usermod -aG sudo username - Open your
/etc/sudoersfile withvisudoornano /etc/sudoers - Make sure the line under
# Allow members of group sudo to execute any commandlooks exacly like this:%sudo ALL=(ALL:ALL) ALL - Restart the
SSHDserver with:/etc/init.d/sshd restart - Logout and then back in with you new non root user (run
logout)
Tip You use ctrl-w with nano to search the file and ctrl-x to close it (hit enter when it asks about the filename and y to confirm).
Setup ssh
Now, lets make things a little more secure by forcing key based authentication for ssh and disabling direct root login:
- First disable root logins by opening
/etc/ssh/sshd_configand changing the linePermitRootLogintoPermitRootLogin no(you might need to get rid of the#prefixing it) - Create a key by running
ssh-keygen -t rsaon the computer you will login in to the server with (make sure to back these keys up) - Now run
scp ~/.ssh/id_rsa.pub username@ipofserver:.ssh/authorized_keys(I’m assuming you’re running Linux) on the same computer to copy the public key to your server - Test by restarting the
sshdserver with/etc/init.d/sshd restartand then trying to login to your server again (on Linux by running on your local machinessh username@ipofserver) - If that worked, you can now disable password logins by opening
/etc/ssh/sshd_configand changing the linePasswordAuthenticationtoPasswordAuthentication no(you might need to get rid of the#prefixing it)
Warning! If you are considering exposing this server through ssh to the outside world, you should look into something like port knocking and authentication rate limiters like fail2ban.
Setup a firewall
Another easy thing you should do to harden your server is setup a basic firewall.
I chose ufw a wrapper for iptables, because it is a lot easier to quickly setup and for something like this we don’t need that much configuration
- Install
ufwwithsudo apt-get install ufw - Make sure it is configured to handle IPv6 too with
sudo nano /etc/default/ufwand making sure that IPv6 is set to yes withIPV6=yes - Lets put together some basic rules: run
sudo ufw default deny incomingandsudo ufw default allow outgoingto block all incoming connections and allow all outgoing connections from the server - Now, lets make sure that we don’t lock ourselves out when the firewall is brought up by allowing
ssh(port 22) connections by runningsudo ufw allow ssh - For good measure, enable
http(port 80) connections andhttps(port 443) connections with:sudo ufw allow httpandsudo ufw allow https. That way, we won’t be blocking any web connections when the web server is up and running - We are now ready to start the firewall with
sudo ufw enable - Check that all of the rules are setup with
sudo ufw status. The output should resemble this:
Status: active

To                         Action      From
--                         ------      ----
22                         ALLOW       Anywhere
443                        ALLOW       Anywhere
80                         ALLOW       Anywhere
22                         ALLOW       Anywhere (v6)
443                        ALLOW       Anywhere (v6)
80                         ALLOW       Anywhere (v6)
Automatic security updates
Another good thing to do in order to harden our system, after-all we are going to be exposing it to the internet, is to setup automatic security updates.
- First, we need to install:
sudo apt-get install unattended-upgrades apt-listchanges. If you get an error about the package not existing, add the following to the end of/etc/apt/sources.list
# backports
deb http://ftp.debian.org/debian jessie-backports main
- Next, open
/etc/apt/apt.conf.d/50unattended-upgradesand add the lineUnattended-Upgrade::Mail "root";inside theUnattended-Upgrade::Origins-Patternblock - Now, just run
dpkg-reconfigure -plow unattended-upgradesin order to configureunattended-upgrades(just hit yes when it asks if it should automatically install certain updates - And we are done!
So now the server is a little more hardened and we are ready to install the software for our web-server:
The software
In order to get this web-server up and running, there are a couple of pieces of software that we will need to install and confgure. These will be apache for the actual web-server, a client to update the IP for the server’s domain name, and certbot for our free SSL certificate.
Port forwarding
Firstly, we are going to need to setup port forwarding. This will allow you to expose your server on specified ports to the outside world (which is a little necessary for a web-server).
Depending on your router, you will probably need to go to 10.0.0.1, 192.168.1.1, or 192.168.0.1 with your browser. Enter your username and password (if you don’t know it, it is probably either written on your router or the default one which you can find online: in which case change it!).
Now, find the menu for port forwarding (probably under advanced) and set it up to port forward ports 80 and 443 (http and https) to your server’s local IP address which you can get by running sudo ifconfig.
Getting a free domain name
Once that is out of the way, you should now get a domain name. This allows people to type in the domain (for instance www.google.com) and have it redirect to your server’s public IP address which can change and is harder to remember. While you can pay for a domain name, it is just as easy to get a free, albeit slightly uglier looking one.
Several companies such as NoIp provide free domain names, so you can just go over to one of their websites and follow their instructions to register one and set up a client on your server.
The web-server
We have finally reached the point where the humble computer gestates into a beautiful web-server. There are a couple of different ways to do this, withapache and nginx being the two big solutions. While both work, and nginx might be a little faster in the context of serving static web pages, in my opinion apache is waaaaayyyyy easier and quicker to setup, especially if later on you want to setup something like Owncloud (a personal cloud server) later on.
Installing Apache
First of all, we clearly need to install apache, which is as easy as running sudo apt-get install apache2.
You can test that this worked by going to ipofyourserver with your web-browser.
Configuring Apache Virtualhosts
The next and last thing that we will need to directly configure with apache is virtuahosts. These allow you to run multiple websites with different domain names from the same server.
- First, we need to create a root direcetoty for your new web-page. Run
sudo mkdir -p /var/www/example.com/public_htmlwithexample.combeing the domain name that you picked up earlier. - Create a demo page for this site by copying the default demo page for
apachewiithsudo cp /var/www/public_html/index.html /var/www/example.com/public_html/index.html - Next up, we need to changethe permissions of this new directotry structure so that
apachewill be able to serve our web-page. Runsudo chgrp -R www-data /var/www/example.com && sudo chown-R www-data /var/www/example.com && sudo chmod -R 755 /var/www - At this point, we need to create the
virtualhostfile by first copying the default one withsudo cp /etc/apache2/sites-available/000-default.conf /etc/apache2/sites-available/example.com.conf - Customize this file by opening it with
sudo nano /etc/apache2/sites-available/example.com.confand then- Setting
ServerAdmin admin@example.comto your email - Setting
ServerNametoexample.com(your domain name) - Changing
DocumentRootto your root directory which we set earlier toDocumentRoot /var/www/example.com/public_html
- Setting
- Enable this new virtualhost and site with
sudo a2ensite example.com.conf - Restart
apachewithsudo service apache2 restart - Test this configuration by navigating to your domain name from outside your local network (for example using your phone connected with data)
Tip! You can use virtualhosts to setup and run multiple websites with different domain names from the same box. Just repeat the same steps for virtualhosts as above, but change the domain name and root directory. You will probably also need to reconfigure your dynamic ddns client to point your new domain name towards the same box, and also rerun the certbot step (up next) to have both sites use the same certificate.
A word of advice! If you want access this site from its domain name from inside your network, you will need to modify your /etc/hosts file if you are running Linux so that that domain resolves to the local IP of your server.
Setting up https for free!
At this point, the web-server is setup and serving a basic page when we connect to it. It even works with a domain name! However, we might want for the sake of security to enable https, and thanks to the wonderful people from Let’s Encrypt , it is not only ridiculously easy, but also free.
They even have a great guide here that shows you how to obtain that nice, shiny green lock.
Finally, the actual website
At last, you are nearing the end of the road. You are just spitting distance away from the random and wise quote, but alas, you have not yet achieved your goal of a beautiful website. You put your faith in me, and I abandon you at this junction with just a pitiful single html page to show for it. But fear not! I have not forsaken you!
In this part of the tutorial I am going to give you a quick overview of Jekyll , the system I used to build this site. I will then show you how to self host, using the web-server we just setup, the content you create using Jekyll.
A quick intro to Jekyll
What is Jekyll?
So, what is Jekyll? In the words of its creators, (or at least the creators of its website),
Jekyll is a simple, blog-aware, static site generator perfect for personal, project, or organization sites.
How does it work?
Basically, the way it works is you take a preexisting theme (or make your own) that defines a bunch of layouts (reformatted pages) and includes (snippets of code to include in pages). You then write your content mainly in markdown and specify which layouts and included to use. Jekyll then compiles your page into html and cssthat the server will serve.
Themes, did you say themes?
The great thing aout Jekyll is that it is pretty widely used, so there is no shortage of free, open source, and sexy themes. If you google jekyll themes, you’ll get a bunch of pages of themes like this one and this one with massive lists of themes. Check a few out, and then just follow the instructions on its webpage to use the theme of your dreams. Jekyll and most themes have pretty good documentation, so between the two of them, you should be pretty well set for building your site.
For reference, the theme I used for this site is called Minimal Mistakes.
Some words of wisdom! In case the documentation does not make it clear, you do all of your development of your webpage on your computer and only push the final compiled result to the server.
Great, but how do I host this?
So, you just put together a sexy, sexy site, the most beautiful to ever grace the interwebs, but wait, how do you actually put this on the interwebs? You may have noticed that the bulk of the explanations for hosting your Jekyll page involve using Github Pages, but you’re here because you want to do this yourself.
Github, we don’t need no stinkin Github! A famous movie or something
So how do you self host?
It is actually pretty simple. You just have to push the contents of _site to your root directory of your web server. The easiest way to do this is to do all of your development on your local machine, and then open your terminal inside the root directory of your Jekyll site (where you can see all of the files and directories starting with _). Then, just run the following to copy the contents of _site onto your server:
jekyll build --destination _site && scp -r ./_site/* username@ipofserver:site
If that gave you a directory does not exist error, run mkdir ~/site on your server first.
After that, move these files to the root directory of your website (get rid of the demo file first) with:
sudo cp -rv site/* /var/www/example.com/public_html/
Now, fix the file permissions with:
sudo chgrp -R www-data /var/www/example.com/public_html
sudo chown -R www-data /var/www/example.com/public_html
And presto, you are done!
Some words of wisdom! Whenever you want to do this again (say, when you update your site), make sure you delete the contents of ~/site on your server before you rerun all of these steps starting with scp.
Some more advice to spare you the hair pulling! If after transferring your built site to the server you get weird looking pages and a bunch of 404 messages, make sure that you only copied the contents of _site into your root web directory and not the directory itself.
And so, it is now time to part ways. Good luck on your journey to build your own website, and I hope this post helped you maintain a little but of sanity.
I’m not quite sure what my next post will be right now, but I’m thinking some game theory is coming up…
Until then, good luck and good day to you!
The more you find out about the world, the more opportunities there are to laugh at it.